Reliable Maintenance thrives on visual clarity. Visual clarity isn’t just helpful—it’s essential. In maintenance, what we see shapes what we do. When visuals are sharp, timely, and relevant, they guide action with speed and certainty. When they’re missing or unclear, even the best instructions can fall flat.
In Part 1: How much details are enough for a Reliable Maintenance program?, we explored the balance of detail in step-by-step instructions. We saw how too little confuses, and too much overwhelms. By applying concepts like cognitive load and chunking, we showed how to write steps that technicians can actually follow—confidently, and without guesswork.
Part 2 “Sharp Instructions, Reliable Results: Set the language,” took it further. We focused on language—how sharp instructions (not aggressive, but precise) prevent mistakes. We talked about tone, reuse, and clarity as a safety tool. Reliable Maintenance depends on instructions that speak clearly, anticipate needs, and respect the person using them.
Now, we bring those lessons to life—visually. Because what workers see on the page or screen must match what they face in the field. Visual clarity bridges that gap. It shows what words can’t. It speeds up understanding, reduces misinterpretation, and highlights critical steps at a glance. You will find deep insights and practices in my course: Secrets of Building a Maintenance Program
This is not decoration. It’s direction. Let’s look at how visual clarity turns good instructions into Reliable Maintenance tools.
Why Visuals Matter for Reliable Maintenance
Reliable Maintenance demands speed, accuracy, and confidence. Visuals support all three.
When a technician sees a clear diagram or photo, they don’t have to guess. They don’t have to read a paragraph to understand what to do next. The image tells the story in a second.
That speed matters in the field. Time pressure is real. Distractions are everywhere. And fatigue sets in. A well-placed visual resets focus. It anchors the mind. It confirms, “Yes, I’m on the right part, the right step, the right tool.”
Visuals also reduce the mental load. Instead of holding every detail in memory, a glance can replace five sentences. That frees up brainpower to focus on action—on doing the job safely and correctly.
And there’s trust. Workers trust instructions more when they see what success looks like. A marked-up photo or a step sketch says, “We’ve done this before, and here’s how.” That confidence turns into better results.
When we build instructions without visuals, we leave too much to chance. And when we build them with the wrong visuals—blurry, outdated, or confusing—we add noise, not clarity.
That’s why visuals matter. They’re not decoration. They’re direction. And they’re essential to Reliable Maintenance. You can know more about the true concepts of Reliability and apply it on a virtual industrial plant in my course: Mastering Reliability Mindset and Practices
Words guide, but visuals anchor the work. When we combine both with intent, each step becomes stronger.
Adding visual clarity doesn’t mean dumping images into a page. It means choosing the right image, placing it at the right moment, and linking it directly to the action.
Let’s look at a simple common maintenance task and see how visual clarity transforms it.
🔧 Task: Isolate Pump for Maintenance via Maneuver Valves
❌ Before (Text Only):
Close the suction and discharge valves before starting work on the pump.
Ensure the drain valve is opened to release trapped fluid.
Confirm isolation using lockout tags.
Problems:
No indication of valve location or type
Sequence isn’t visualized
No confirmation cues
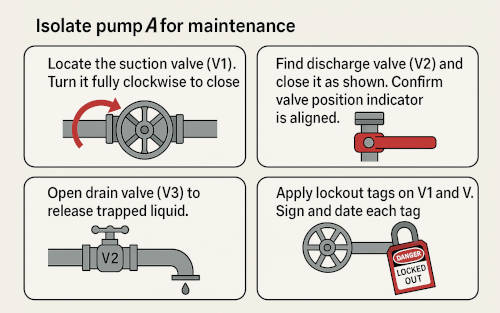
✅ After (With Visual Clarity):
1. Locate the suction valve (labeled V1). Turn it fully clockwise to close .
3. Open drain valve (V3) to release trapped liquid. Use a tray below to catch any fluid.
2. Find discharge valve (V2) and close it as shown. Confirm valve position indicator is aligned.
4. Apply lockout tags on V1 and V2. Sign and date each tag.
Why it works:
Each valve is shown clearly, with labeling (V1, V2, V3)
Motion is reinforced with arrows
Visuals confirm location and direction
Lockout is visibly confirmed, not assumed
🔧Another Example
Before (Text Only):
Remove the filter cover by turning the locking knob counter-clockwise.
Carefully lift the cover upward. Avoid damaging the gasket underneath.
What’s missing? The technician must guess where the knob is, how it looks, and how much force to apply. That opens the door to hesitation—or damage.
✅ After (With Visual Clarity):
3. Turn the locking knob (highlighted) counter-clockwise. 4. Lift the cover gently, as shown. Watch the gasket (marked in red)
Why it works:
The image shows exact part location
Arrows show motion
Highlights show risk areas
Text and image reinforce each other
Now, imagine this approach applied to every critical step—tools, torque points, fluid levels, connectors. Visual clarity becomes a habit, not an afterthought.
Also consider sequencing. Showing before, during, and after states removes doubt and makes each task repeatable. Think of it as “show, guide, confirm.”
✏️ Quick Tip:
Use captions with every image. Avoid floating images without clear links to steps. The visual must speak with the instruction, not aside of it.
Clear visuals reduce errors, speed up execution, and improve confidence. When built into every step, they become the quiet teacher behind Reliable Maintenance.
Common Pitfalls That Kill Visual Clarity
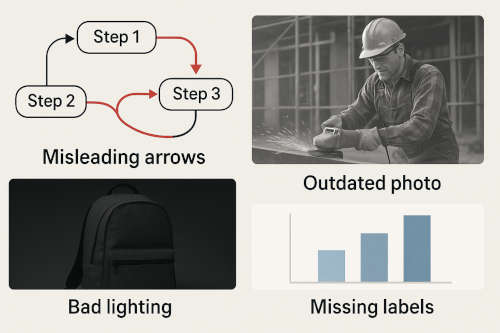
One of the most common pitfalls that undermine visual clarity is the misuse of arrows and directional cues. Arrows are meant to guide the viewer’s attention or illustrate a process, but when they are ambiguous, point in multiple directions, or overlap with other elements, they cause confusion instead of clarity. For example, a flowchart with arrows crossing over each other or pointing to the wrong step can make a simple process appear complicated and difficult to follow. In instructional diagrams, unclear arrows may mislead users, resulting in mistakes or misunderstandings.
Another factor that can kill visual clarity is the use of outdated or irrelevant photos. Visuals should enhance understanding and reflect the current context, but using old or mismatched images can send the wrong message. For instance, a safety manual featuring photos of obsolete equipment may confuse workers who use modern tools, leading to improper procedures. Similarly, marketing materials that display outdated fashion or technology can make a brand appear disconnected from its audience, undermining trust and engagement.
Poor lighting and missing labels are additional issues that frequently ruin visual clarity. Bad lighting can obscure important details in photos or videos, making it hard for viewers to see what matters. For example, a product photo taken in dim light may hide features that buyers need to evaluate. Missing labels on diagrams or charts force viewers to guess the meaning of symbols or data, increasing the risk of misinterpretation. In a medical chart, for example, unlabeled axes or unclear color codes could lead to critical errors in diagnosis or treatment – similar to what might happen in maintenance-. Clear, well-lit visuals with precise labels are essential for effective communication.
Final Thought
Visual clarity is more than an aid—it’s a form of respect. It respects time, sharpens focus, and protects against error. When we embed visuals into instructions with care, we don’t just help people follow steps—we help them succeed.
But Reliable Maintenance doesn’t end at the screen or the page. The field is where real decisions happen. And in that environment, clarity must live on equipment, walls, labels, and lines. The most well-designed instruction fails if it can’t be followed in real space, under real pressure.
In Part 4, we take the next step. We explore how field designations, tags, and physical cues support instructions—and bring visual clarity into the environment itself.
That’s how we close the gap between planning and doing. And that’s how we build Reliable Maintenance that lasts.
If you feel you need help with any of these ideas we discussed, request a Management Consultancy or Coaching Services From our Store
The first Thirty-Three (33) Questions to check the existing assets maintainability. You can apply them easily while monitoring the job execution. They are designed to boost maintainability.
In the world of industrial maintenance, we often hear about complex, expensive AI solutions implemented by large organizations. But what if the real revolution is happening right in front of us – at the individual practitioner’s level? Imagine transforming your maintenance approach using free, accessible AI tools that are just a click away.
There are a lot of analogies between transformers and our life. Learn some transformers’ foundations and lessons learned from them into our daily life and work
Autonomous mindset embodies a state of self-reliance, independence, and the capacity to make decisions and take actions without needing constant external input or direction. Let’s break down what it takes to develop this mindset